Extruder Die Maintenance: Cleaning, Inspection, Storage, and Reuse Workflow
An extrusion die is a precision tooling component, and its condition directly affects surface quality, startup stability, contamination control, and dimensional consistency.
Many die-related defects are not created during steady production. They are introduced after shutdown, when the die is removed, cleaned, inspected, stored, or reinstalled without enough control.
This guide focuses on a practical post-run workflow for extruder die maintenance: safe removal, residue cleaning, die lip and flow-channel inspection, corrosion protection, storage, and pre-installation checks.
If your team already follows a routine inspection system, this article should be read as the deeper tooling-level step after those checks. Daily and weekly maintenance helps identify buildup, leakage, wear, and abnormal operating conditions during production. But once the die is removed from the line, it needs a separate handling process to prevent the tool itself from becoming the source of the next defect. For a broader machine-level routine, see our daily, weekly, and monthly extrusion line maintenance checklist.
The principle is simple:
A die should be cleaned without being scratched, stored without being exposed, and reinstalled only after its critical surfaces are confirmed ready for production again.

Extruder Die Maintenance Workflow
A good extruder die maintenance procedure is not only about removing plastic residue. It should cover the full handling cycle from shutdown to reuse.
A practical workflow usually includes:
- Stabilize the line before shutdown
- Purge or reduce remaining material before disassembly
- Control die temperature so residue can be removed safely
- Remove the die without damaging lips, sealing faces, or matched parts
- Clean residue in the right sequence
- Adjust the cleaning method based on the last processed material
- Inspect the die lip, land area, flow channels, corners, and sealing faces
- Identify scratches, carbonized residue, corrosion, coating damage, or impact marks
- Apply rust protection after cleaning and drying
- Store the die in a controlled location
- Recheck the die before reinstallation
- Escalate visible damage for qualified repair instead of informal hand correction
This workflow matters because the next visible production problem may begin during the previous die handling cycle. Poor cleaning, rough handling, unprotected storage, moisture exposure, or incomplete inspection can leave residue, surface damage, corrosion risk, or assembly problems that only become visible after startup.
Why Die Maintenance Affects Product Quality
Die maintenance is important because the die controls the final flow path before the melt becomes the product shape. When residue, damage, corrosion, or poor reassembly affects this area, the result may appear as a product defect instead of an obvious tooling problem.
Poor die handling can increase the risk of:
- Black specks from degraded or carbonized residue
- Die lines caused by buildup, blockage, or surface damage
- Flow marks or surface streaks from residue hang-up or scratches
- Startup contamination released from corners or low-flow areas
- Leakage caused by poor sealing-face condition
- Possible dimensional instability when flow distribution is affected
These defects are not always caused by the die. Temperature control, screw output, raw material, cooling, calibration, and haul-off behavior can also be involved. But if a defect appears after die cleaning, die change, storage, or reinstallation, the die handling history should be checked before repeated process adjustments are made.
1. Control Shutdown and Die Temperature Before Removal
Good die maintenance starts before the die is fully removed from the line.
The goal is not simply to stop the machine. The goal is to leave the die in a condition that makes cleaning safer and reduces the chance of hardened residue, thermal shock, or operator damage during disassembly.
Before removal, the team should confirm:
- The line has been stopped according to the material and machine procedure
- Pressure has been reduced safely
- The material has been purged or reduced as much as practical
- Heaters, cooling, and power isolation follow internal safety rules
- The die is still at a manageable temperature for residue removal, if warm cleaning is required
- Operators have proper heat protection and lifting support
Temperature control is important because residue behavior changes quickly. If the die is allowed to cool too far, polymer residue may harden and become much more difficult to remove. This often leads operators to use excessive force, steel tools, or uncontrolled scraping.
On the other hand, disassembling a die while it is too hot creates burn risk, handling risk, and possible damage caused by rushed work.
The practical target is controlled removal: safe enough for handling, but not so cold that residue becomes a hard block that forces aggressive cleaning.
2. Remove Residue in the Right Order
The first rule of extrusion die cleaning is not to remove plastic as aggressively as possible. The first rule is to remove residue without changing the die surface.
A good residue cleaning sequence usually follows this logic:
- Remove bulk residue first while it is still manageable
- Clean accessible flow areas before fine details
- Work around lips, corners, and sealing faces slowly
- Remove residue from low-flow or dead areas where degraded material may remain
- Finish with inspection rather than casual polishing
This sequence helps prevent two common mistakes.
The first mistake is attacking the most delicate areas too early. Die lips, land areas, polished flow surfaces, and sealing faces should not be scraped aggressively just because residue is visible.
The second mistake is making the die look clean on the outside while leaving residue inside corners, flow transitions, or recessed areas. These hidden deposits may later break loose during startup and appear as black specks, streaks, or contamination.
A cleaned die should be clean where flow happens, not only where operators can easily see.
3. Use Cleaning Tools That Are Softer Than the Die Surface
Many avoidable tooling problems begin during rushed cleanup. Steel screwdrivers, hard scrapers, wire brushes, and other aggressive tools may remove residue quickly, but they can also leave scratches, rounded edges, dents, or damaged sealing faces.
Those marks may later contribute to:
- Die lines on the product surface
- Surface streaks or drag marks
- Repeated startup contamination
- Polymer hang-up points
- Leakage around sealing faces
- Flow instability caused by damaged geometry
A safe die-cleaning toolkit usually includes:
- Brass or copper brushes
- Brass or copper scrapers
- Wooden scrapers
- Hard plastic cleaning tools where appropriate
- Non-woven cloths or clean industrial wiping cloths
- Controlled compressed air use
- Suitable die cleaning compounds where approved
- Approved heated cleaning methods where required

The principle is straightforward: the cleaning tool should be softer than the die steel or protected surface so it can remove residue without damaging precision areas.
This is especially important around:
- Die lips
- Land areas
- Polished melt-contact surfaces
- Flow channels
- Flow transitions
- Corners and low-flow areas
- Sealing faces
- Matched component surfaces
Good cleaning discipline also includes good handling discipline. After a part is cleaned, it should be placed on a clean, protected surface. It should not be stacked against other metal parts, dragged across a bench, or left exposed where another operator may accidentally hit it.
4. Adjust Cleaning Based on the Last Processed Material
Not all residues behave the same way. A good die maintenance procedure should consider what material was last processed.
A generic “scrape everything until it looks clean” approach is exactly how precision tooling gets damaged.
PE and PP Residues
PE and PP residues often soften and release more easily than some higher-temperature or more sensitive materials. However, if shutdown was poorly managed and material sat too long at heat, carbonized residue may remain in corners, dead spots, or low-flow areas.
In that case, the risk is not only leftover plastic. The bigger risk is that degraded material later breaks loose during startup and appears as contamination, black specks, or surface marks.
PVC Residues
PVC requires more caution. If PVC residue has been overheated or left sitting too long, it can degrade more aggressively and become harder to remove safely.
Delayed cleaning can also increase the risk of corrosion-related problems or startup contamination. When PVC has been run, post-run die cleaning should be treated with more urgency and more care, especially around corners, lips, and low-flow areas where degraded material may collect.
Engineering Plastics and Higher-Temperature Materials
Some engineering plastics and higher-temperature materials can cling more strongly, leave tougher residue, or make operators more likely to over-scrape during removal.
This raises the risk of surface damage. In these cases, patience and approved cleaning methods matter more than speed.
Color Change or Recycled Material Runs
If the previous run involved color change, recycled material, filled compounds, or unstable raw material quality, the die should be inspected more carefully for trapped particles, pigment residue, degraded polymer, or contamination in low-flow areas.
Even when the die looks clean, small retained deposits can create startup specks or streaks in the next run.
The practical point is simple:
The last processed material should influence how the die is cleaned, how urgently it is cleaned, and how carefully it is inspected afterward.
5. Inspect the Die Lip, Land Area, and Flow Channels
Cleaning is not complete until the critical die areas have been inspected.
The most important areas usually include:
- Die lip
- Land area
- Flow channels
- Flow transitions
- Corners and low-flow areas
- Sealing faces
- Bolt holes and mounting surfaces
- Matched component surfaces
- Coated or polished surfaces, if applicable
Die Lip Inspection
The die lip directly affects product surface formation and dimensional consistency. Small defects here can create repeated lines, edge marks, thickness variation, or unstable flow behavior.
During inspection, look for:
- Nicks or dents
- Scratches along the flow direction
- Rounded or damaged edges
- Residue stuck near the exit
- Uneven wear
- Corrosion marks
- Signs of accidental impact
A damaged die lip should not be casually polished by an unqualified operator. Even a small geometry change can affect the product.
Land Area Inspection
The land area helps stabilize the melt before it exits the die. Residue, scratches, or uneven wear in this area can affect flow stability and surface quality.
Check for:
- Carbonized residue
- Drag marks
- Surface scratches
- Uneven buildup
- Wear patterns
- Discoloration or staining
If repeated product marks appear in the same position after startup, the land area should be one of the first places to inspect.
Flow Channel Inspection
Flow channels and transitions are common areas for residue retention, especially in corners, low-flow areas, or poorly cleaned passages.
Check for:
- Hardened polymer
- Blackened or carbonized deposits
- Pigment accumulation
- Contamination trapped in corners
- Scratches from tools
- Damage to coated, polished, or treated surfaces if the die uses them
- Corrosion in recessed areas
Residue left in these areas may not show immediately when the die is inspected externally. But once the die heats up and production resumes, trapped material can release into the melt stream and cause black specks, streaks, or startup contamination.
6. Identify Scratches, Carbonized Residue, Corrosion, and Coating Damage
A practical die inspection should not simply ask whether the die is “clean.” It should classify what kind of risk remains.
Scratches
Scratches are not only cosmetic. A scratch on a flow surface can become a hang-up point for polymer residue. A scratch near the die lip can create repeated surface marks. A scratch on a sealing face can contribute to leakage.
Important questions include:
- Is the scratch on a flow-contact surface?
- Is it near the die lip or land area?
- Does it align with a repeated product mark?
- Could it trap degraded material?
- Could it affect sealing?
Carbonized Residue
Carbonized residue is a major source of black specks and startup contamination. It often forms when material remains in hot zones for too long, especially in corners, dead spots, or low-flow regions.
If carbonized residue is found, the team should consider both cleaning and process history:
- Was shutdown delayed?
- Was the die left hot with material inside?
- Was the previous material heat-sensitive?
- Are there low-flow areas where residue repeatedly collects?
Removing the residue matters, but understanding why it formed helps prevent recurrence.
Corrosion
Corrosion can damage sealing faces, polished surfaces, and flow-contact areas. It may be caused by moisture exposure, poor drying, unsuitable storage, material residue, or humidity in the workshop.
Corrosion risk is especially important when the die has been stored for a long time, stored without protection, or used with materials that require extra post-run care.
Coating or Surface Treatment Damage
Some dies may have polished, plated, coated, or otherwise treated surfaces. If a coating or treated surface is damaged, the issue should be evaluated carefully.
Do not assume that aggressive cleaning can restore the surface. Improper scraping or polishing may make the problem worse and shorten tooling life.
If coating damage is suspected, the die should be escalated for qualified evaluation.
7. Finish Routine Cleaning With Inspection, Not Casual Polishing
The final step of routine die cleaning should be inspection, not routine polishing.
This distinction is important.
It may be tempting to treat light hand polishing as a normal finishing step, but this is risky language for a shop-floor SOP. Operators may interpret it as permission to “improve” die lips, polished surfaces, or sealing areas casually.
That can alter the exact geometry the die depends on.
Instead, routine cleaning should finish with a structured inspection:
- Check the die lips carefully
- Inspect polished melt-contact surfaces
- Look for residue in corners, recesses, transitions, and low-flow areas
- Confirm sealing faces are clean and not visibly damaged
- Check for visible rust, staining, scratches, dents, or corrosion
- Remove loose debris before protection and storage
- Document suspected damage before the die is put away
If critical surfaces appear scratched, chipped, rounded, corroded, or otherwise damaged, the issue has moved beyond routine cleaning.
At that point, the correct question is not:
“Can someone touch this up quickly?”
The correct question is:
“Will this damage affect flow, sealing, startup stability, or product quality?”
For equipment-side cleaning beyond the die, see our guide on how to clean an extruder screw and barrel.
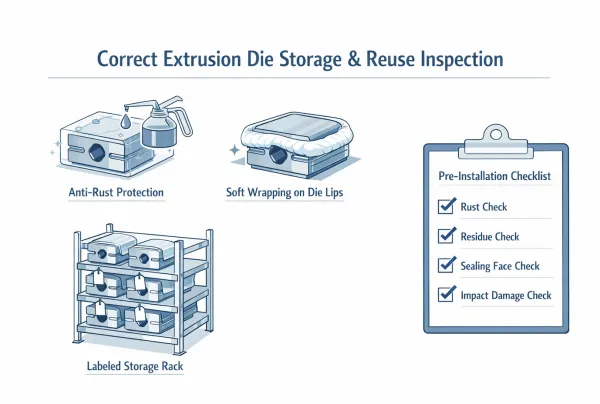
8. Apply Rust Protection After Shutdown and Cleaning
A die can be cleaned correctly and still be damaged after shutdown if it is left exposed.
Once cleaning and inspection are finished, the die should be fully dry before protection. Trapped moisture under oil, wrapping, or protective material can create hidden corrosion that may only be discovered during the next startup.
A practical rust-prevention routine should confirm:
- No visible moisture remains after cleaning
- No cleaning liquid is trapped in corners or threaded areas
- No residue remains in flow areas or sealing faces
- No loose debris is present before wrapping
- Critical surfaces are dry before corrosion protection is applied
A clean die surface should then be protected with a suitable rust inhibitor or anti-rust oil where appropriate for the tooling type, storage duration, and workshop environment.
The goal is not to drench the die carelessly. The goal is to protect exposed precision surfaces from oxidation while the die is out of service.
Corrosion protection is especially important when:
- The die will be stored for more than a short interval
- The workshop has high humidity
- Seasonal condensation is common
- The die has been used with sensitive or corrosive materials
- The die will be stored near cooling water, open doors, or uncontrolled air movement
Before reuse, any protective material should be removed according to internal procedure so it does not contaminate the next startup.
For broader seasonal maintenance and humidity-control considerations, see our guide on preventive maintenance for extrusion lines.
9. Store the Die for Short-Term and Long-Term Reuse
Extrusion die storage must be treated as part of extruder die maintenance, not as a separate warehouse task.
Once a die is clean, the risks change. The main risks are no longer molten polymer and operating pressure. They are:
- Corrosion
- Moisture exposure
- Airborne contamination
- Accidental impact
- Metal-to-metal contact
- Part mix-up
- Poor handling
- Missing components
- Loss of maintenance traceability
A clean die is not automatically a protected die.
Short-Term Storage
For short-term storage between nearby production runs, the die should still be protected from dust, moisture, and contact damage.
The team should avoid leaving the die uncovered on an open bench, near cooling water, beside raw materials, or in a traffic area where accidental contact is likely.
Even short storage can create problems if the die lip is bumped, the sealing face is scratched, or loose dust enters the flow area.
Long-Term Storage
For long-term storage, the standard should be stricter.
The die should be:
- Fully cleaned and dried
- Protected with suitable anti-rust treatment
- Wrapped or covered where appropriate
- Stored on a dedicated rack or protected surface
- Kept away from moisture and uncontrolled handling
- Clearly labeled
- Stored with matched components organized
- Checked periodically if the environment is humid or storage time is long
Each stored die should be clearly identified so the team can quickly confirm:
- Die number or die code
- Product or application
- Last processed material if relevant
- Last cleaning date
- Maintenance status
- Matching components
- Any known damage or caution note
- Whether repair evaluation is pending
Do not leave dies directly on the floor. Do not mix unmatched components. Do not create a situation where the next operator has to guess which condition the die was left in.
When storage is handled well, the die remains production-ready. When storage is handled badly, the next startup inherits the damage.
10. Check the Die Before Reinstalling It
A die should not go back onto the line simply because it looks “clean enough.”
The period just before reinstallation is the final checkpoint in the maintenance chain. It is the point where the team confirms whether cleaning and storage were successful, or whether new risks were introduced while the die was offline.
Before reinstalling the die, check for:
- Visible rust or staining
- Dust, debris, or remaining protective material
- Signs of impact damage
- Scratches on visible critical areas
- Residue in corners, die lips, or melt-contact areas
- Sealing-face condition
- Completeness of matching components
- Correct fasteners, inserts, and related parts where applicable
- Any previous maintenance note or unresolved damage record
This check should be calm and deliberate. It is much cheaper to stop and correct a tooling issue before startup than to discover the problem through scrap, repeated marks, contamination, or unstable production afterward.
A pre-installation check also protects the diagnostic process. If the die is confirmed clean, protected, and undamaged before installation, the team can troubleshoot future defects with more confidence.
11. Know When the Die Has Moved Beyond Routine Maintenance
This boundary is important.
Routine maintenance covers cleaning, protection, storage, and pre-installation verification. It does not automatically include geometry correction on critical areas.
If the die shows any of the following, the issue should be escalated for qualified repair evaluation instead of informal hand correction:
- Damage to die lips
- Visible scratches on polished flow surfaces
- Compromised sealing faces
- Repeated product marks that remain after proper cleaning
- Recurring startup contamination that suggests trapped residue or tooling damage
- Deformation or impact damage
- Questionable alignment condition
- Corrosion on critical contact or flow areas
- Coating or surface treatment damage

This is where many factories lose tooling life unnecessarily. A small defect is treated casually, someone attempts a quick hand fix, and the result becomes a larger quality problem than the original damage.
The safer rule is simple:
Do not let routine maintenance turn into unqualified die repair.
If a die needs repair, the repair decision should be based on tool geometry, product requirements, defect history, and qualified inspection—not on a quick attempt to make the surface look better.
Good Die Maintenance Reduces False Troubleshooting
One of the most practical reasons to improve extruder die maintenance is that it reduces false troubleshooting later.
When die cleaning, storage, or reinstallation are handled poorly, the next defect may be blamed on temperature, output rate, cooling, haul-off speed, raw material, or line balance. Those factors should still be checked, but the die handling history should not be ignored.
If the product shows black specks, die lines, flow marks, repeated surface defects, startup contamination, or damage-like streaks after die cleaning or reinstallation, the die should be included in the troubleshooting path.
For a broader troubleshooting framework, see our plastic extrusion troubleshooting guide.
Conclusion
Many die-related defects are created between runs, not during the run itself.
A die can leave production in good condition and return with avoidable risk if it is scraped with hard tools, placed on rough surfaces, stored without protection, exposed to moisture, mixed with unmatched components, or reinstalled without inspection.
Good extruder die maintenance protects more than the die. It helps protect surface quality, startup stability, contamination control, dimensional consistency, and the clarity of future troubleshooting.
The practical rule is straightforward:
Clean the die without damaging it, inspect the areas that control flow, store it without exposure, and reinstall it only after its critical surfaces are confirmed ready for production.
When factories follow this discipline, they reduce the risk of avoidable die lines, black specks, startup defects, flow marks, contamination issues, and repeated troubleshooting cycles.
If your die is already causing repeated lines, startup marks, black specks, or contamination after cleaning, review not only the die condition itself, but also how it was last shut down, cleaned, inspected, stored, and reinstalled.
If you need support evaluating a die that is already showing repeat defects, send the product type, material, defect photos, and recent die handling history. Contact Us
FAQ
Q1: How often should an extrusion die be cleaned?
An extrusion die should be cleaned whenever it is removed from service, especially after material changes, color changes, contamination events, or any run where residue buildup is likely.
There is no universal fixed interval. The right cleaning frequency depends on the material processed, product surface sensitivity, die design, operating temperature, shutdown condition, and how much residue remains after the previous run.
Q2: Why are brass or copper tools safer than steel tools for die cleaning?
Brass and copper are softer than the hardened steel used in many extrusion dies. They can remove residue with less risk of scratching die lips, polished melt-contact surfaces, or sealing faces.
Steel tools may remove residue quickly, but they can also create scratches, dents, rounded edges, or small damage points that later become die lines, residue hang-up areas, or sealing problems.
Q3: Does PVC residue require extra caution during die cleaning?
Yes. PVC residue that has been overheated or left sitting too long can degrade aggressively, become harder to remove, and increase the risk of corrosion-related problems or startup contamination later.
When PVC has been run, the die should be cleaned promptly and carefully, especially around corners, lips, and low-flow areas where degraded material may collect.
Q4: What die areas should be checked before reinstallation?
Before reinstallation, check the die lip, land area, flow channels, corners, low-flow areas, sealing faces, matched surfaces, fasteners, inserts, and any coated or polished surfaces.
The goal is to confirm that there is no visible residue, rust, impact damage, scratch, missing part, or unresolved maintenance note before the die returns to production.
Q5: Can poor die maintenance cause black specks or surface streaks?
Yes. Hardened residue, degraded material trapped in low-flow areas, corrosion, scratches, and poor post-cleaning storage can all contribute to black specks, surface streaks, startup contamination, or repeated surface marks.
If these defects appear after a die has been cleaned and reinstalled, the die handling history should be reviewed as part of the troubleshooting process.
Q6: Can die condition affect wall thickness stability?
Yes, but it should be evaluated carefully. Wall thickness instability can come from output fluctuation, haul-off speed, cooling, calibration, material behavior, or die-related flow imbalance.
If wall thickness problems appear after die cleaning, die change, or reinstallation, inspect for residue restriction, die lip damage, uneven buildup, poor sealing, misalignment, or incomplete assembly.
Q7: How long can a die stay in storage before it needs to be checked again?
Any die that has been stored for more than a short interval should be checked before reuse, even if it was properly cleaned and protected.
The longer the storage period and the less controlled the environment, the more important it becomes to verify rust protection, surface condition, cleanliness, and the completeness of matched parts before reinstallation.
Q8: When should a die be sent for professional repair instead of cleaned in-house?
A die should be evaluated for qualified repair when it shows lip damage, scratches on polished flow surfaces, compromised sealing faces, corrosion on critical areas, coating damage, repeated product marks that persist after proper cleaning, or recurring startup contamination that suggests trapped residue or structural tooling damage.
These issues are beyond routine maintenance and should not be addressed with informal shop-floor touch-ups.
Have Technical Questions?
Our engineering team is ready to help with your extrusion process or machine configuration.

Jason Shen
Jason is the founder of Jinxin Extruder and a veteran engineer with over 20 years of hands-on experience in plastic machinery.
Starting his career on the shop floor, he mastered every technical detail—from electrical wiring to complex troubleshooting.
Today, he personally oversees final inspections, ensuring every machine is built with deep technical expertise and field-tested reliability.
Further Reading
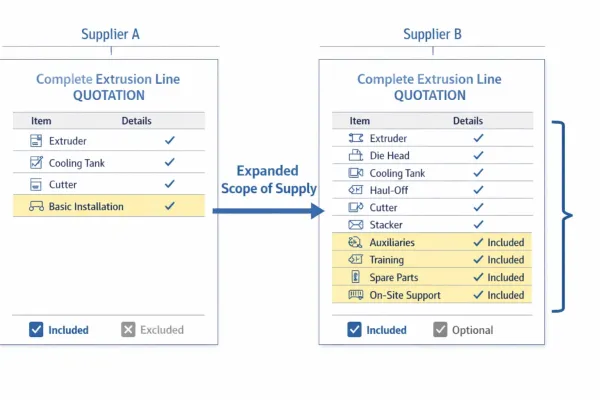
Extrusion Line Quotation: What Is Included and What to Check Before You Buy
Comparing extrusion line quotations? Use this scope of supply checklist to see what is included, what is typically excluded, and…Extrusion Screen Changer & Melt Filtration: How to Reduce Contamination and Pressure Fluctuation
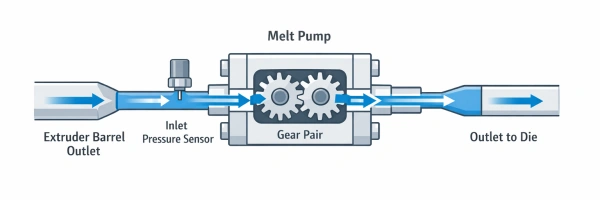
A practical guide to screen changers in plastic extrusion — how melt filtration controls contamination, why screen changes cause pressure…