How to Clean an Extruder Screw and Barrel: When to Purge, When to Tear Down, and How to Avoid Recurring Contamination

Knowing how to clean an extruder screw and barrel properly is not just a maintenance issue. It is a production-control decision. In many cases, routine purging is enough to remove residual polymer and prevent contamination from getting worse. But when black specks, aged deposits, or trapped residue keep returning, mechanical cleaning may become necessary. The key is knowing when to purge, when to tear down, and how to avoid making contamination worse through the wrong cleaning method.
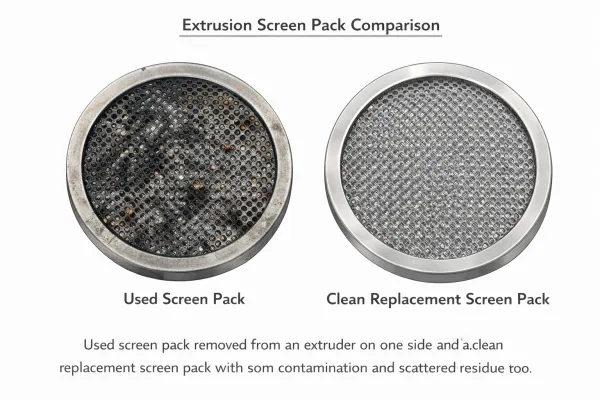
Most extruder contamination problems do not begin with bad tools. They begin with aged residue. Material stays hot too long, sits in a low-flow area, sees repeated heating cycles, or is never fully displaced during a changeover. Over time, that residue degrades, oxidizes, or carbonizes. Later, it appears as black specks, color streaks, gels, or unstable startup scrap.
That is why the real question is not simply how to clean an extruder screw and barrel. The real question is when routine purging is enough, when tear-down cleaning is justified, and how to stop a contamination event from becoming a recurring production problem.
Two Cleaning Methods, Two Different Jobs

Extruder cleaning usually falls into two levels of intervention.
The first is purging. This is the default method for routine color changes, normal material changeovers, preventive cleaning during long runs, and controlled shutdown preparation. The machine stays assembled, downtime is relatively short, and the goal is to displace residual polymer before it has time to age further inside the system.
The second is mechanical cleaning. This is the escalation step. It means opening the system and physically removing deposits that are no longer clearing reliably through purge alone. That may involve the screw, barrel-accessible residue, breaker plate area, adapter, die path, or other hold-up zones. Mechanical cleaning is slower, more labor-intensive, and more sensitive from both a safety and equipment-care standpoint.
A useful way to frame the difference is this: purging manages residual polymer; mechanical cleaning removes residue that has already become a deposit.
Why Extruder Screws and Barrels Become Dirty

A screw and barrel do not become dirty in the same way a workshop floor becomes dirty. In most cases, the contamination starts as residual polymer that stayed too long in the wrong condition.
A screw and barrel do not become dirty in the same way a workshop floor becomes dirty. In most cases, the contamination starts as residual polymer that stayed too long in the wrong condition inside the machine. If you need a clearer picture of what the screw and barrel actually do during processing, see our guide to the plastic extruder machine.
That condition may include long hot idle time, repeated heating and cooling cycles, poor shutdown practice, incomplete displacement during material changeover, or low-flow areas where old material sits and ages. In some cases, contamination also enters from elsewhere in the process, such as feed handling, filtration zones, adapters, or dies.
Once residue remains hot long enough, it does not stay neutral. It degrades. It oxidizes. It may carbonize. Later, that aged material shows up as black specks, color streaks, gels, or unstable startup scrap.
This is why many contamination problems are misdiagnosed. The defect appears at the product, but the source may be older material trapped in the machine from a previous run, a previous shutdown, or a previous transition that was never truly cleaned out.
How to Decide Between Purging and Mechanical Cleaning

This is the most important decision in the whole cleaning process. In normal situations, start with purge.
That includes standard color changeovers, routine material transitions, preventive cleaning during long campaigns, controlled cleanup before shutdown, and early-stage startup contamination that is clearly trending down. In these situations, a purge is usually the right tool because the contamination is still behaving like ordinary carryover. It is being displaced, and the line is moving toward a clean condition.
Mechanical cleaning becomes justified when the contamination pattern changes.
That includes situations where the machine appears clean briefly and then black specks return, startup scrap never really settles back to normal, purge consumption keeps increasing without improving the result, contamination followed an overheating event or poor shutdown, or a difficult material transition left residue trapped in hold-up areas.
The most reliable signal is not a single snapshot. It is the trend.
If contamination is steadily decreasing, purge is still doing its job. If contamination clears for a moment and then returns at the same level, purge is no longer solving the root problem. That is when continued purging stops being disciplined cleaning and starts becoming expensive hope.
When Purging Is Usually Enough
Purging is usually enough when the contamination is still mobile and the machine is responding in a predictable way.
That includes routine material changes, standard color changes, preventive cleanouts during long production campaigns, and controlled shutdown preparation. In these situations, the job is to remove residual polymer before it becomes aged deposit.
A good purge is not just running some cleaning material through the machine and hoping for the best. It is a controlled transition. Remove as much of the previous resin as possible first. Use a purge compound suited to the resin family and cleaning task. Watch the trend in the discharge, not just the first moment that looks cleaner. Then finish the transition properly by stabilizing the next production resin.
In practical terms, purging is working when contamination keeps trending down, the output becomes predictably cleaner, and the line returns to stable production without recurring black specks or repeated startup scrap.
When to Pull an Extruder Screw for Mechanical Cleaning
You should consider pulling an extruder screw when contamination repeatedly returns after apparently successful purging, when deposits are clearly aged or carbonized, or when residue is likely trapped in areas that purge cannot clean reliably.
A screw pull may also become reasonable after long hot idle periods, poor shutdowns, overheating events, or repeated difficult transitions that leave the machine carrying old deposits from earlier runs. In these situations, the issue is no longer ordinary carryover. It is persistent contamination.
But one point matters here: a pulled screw does not automatically mean a clean machine.
If the real contamination source is in the adapter, breaker plate area, die channels, vent zone, or another hold-up area, a plant can spend hours on mechanical cleaning and still restart into the same problem. The purpose of tear-down is not simply to do more work. It is to clean the right places for the right reason.
How PP/PE Changeovers Can Create Recurring Contamination
PP and PE are a useful example because they show how a routine changeover can turn into a deeper cleaning problem.
The issue is not that PP and PE cannot share one line. The issue is that they often do not run in the same processing window. A transition between them may involve a real temperature change as well as a material change.
When a line switches from PE to PP, leftover PE can be exposed to a hotter thermal history if it was not displaced cleanly first. When the line switches back from PP to PE, earlier residue may become harder to displace completely under the new condition, especially if the earlier cleanout was weak or the machine was already carrying deposits.
Over repeated transitions, contamination can build in layers. A small amount remains after one run. New material flows over it. Another transition happens. Another thin layer remains. Later, another heat cycle ages those older residues further. At some point, the machine looks clean for a while, then starts producing black specks again after some running time.
That pattern matters because it shows the contamination is no longer simple carryover. It has become layered or trapped contamination. At that point, a screw pull may become justified.
PP/PE is only one example. The same decision logic applies more broadly across extrusion cleaning situations, but the exact cleaning details must still be adjusted to the resin family and contamination mechanism.
Different Resins, Different Contamination Risks
PP/PE is only one example of how shared-line changeovers create cleaning challenges. But not all materials foul equipment the same way. Some resins are mainly a carryover problem. Some are a thermal-history problem. Some are highly sensitive to residence time, oxidation, or shutdown practice.
PVC, for example, degrades faster under heat than polyolefins, tolerates less residence time, and releases corrosive byproducts during degradation. That changes the urgency of shutdown cleaning, the purge compound selection, and the post-cleaning protection steps — even though the decision logic (purge first, read the trend, escalate if needed) still applies.
The framework in this article is designed to be broadly applicable. But the specific purge grade, temperature limits, shutdown method, and escalation threshold must still be adjusted to the resin family and the actual contamination mechanism.
What Good Extruder Barrel Cleaning Looks Like
Good extruder barrel cleaning is controlled, not improvised.
Start by removing as much of the previous resin as possible. Do not treat the purge compound as a magic fix for careless preparation. Select a purge material that matches the actual cleaning task rather than using the same product by habit. Then judge the result by the contamination trend, not by one short section of cleaner-looking discharge.
If the contamination continues to move down and the line stabilizes, the cleaning method is working. If the machine becomes clean only briefly and then falls back into the same problem, the remaining contamination is probably trapped rather than simply being displaced.
For mechanical cleaning, the same principle applies. The goal is not just to make the screw look cleaner. The goal is to remove deposits without damaging surfaces, creating new retention points, or missing the real contamination source somewhere else in the flow path.
Common Extruder Cleaning Mistakes That Make Contamination Worse

One of the most common mistakes is using production resin as if it were a real cleaning method. That may look cheaper at first, but it is usually weak against aged residue and carbon contamination.
Another common mistake is leaving the machine hot during a poor shutdown. Hot residual polymer plus time is one of the fastest ways to create future black-speck problems.
A third mistake is continuing to purge after the evidence already says the contamination is trapped. Once the machine is only getting temporarily cleaner, more purge often increases cost without changing the result.
Some plants also treat every contamination event like a simple color change. But not all contamination events are equally easy. Material history, temperature transition, residence time, and hold-up zones all matter.
Another serious mistake is damaging metal surfaces during manual cleaning. Aggressive or improvised methods may remove deposits today while creating new dead zones for tomorrow.
And finally, many teams blame the screw for everything. In reality, contamination may also come from the feed path, filtration area, breaker plate, adapter, die path, or poor process discipline elsewhere in the line. In some cases, upstream feed handling and hopper issues make contamination and unstable cleanout worse long before the screw itself becomes the main problem.
How to Reduce Future Screw and Barrel Cleaning Frequency
The cheapest deep cleaning job is the one you never need.
That does not mean cleaning less. It means cleaning earlier and more intelligently.
Plants that reduce screw-pull frequency usually build preventive purge into real production events. That includes routine material transitions, difficult temperature-window changes, long campaigns, and planned shutdowns where residual polymer would otherwise remain hot inside the machine. This kind of preventive discipline works best when it is built into a broader routine extrusion line maintenance checklist.
They also reduce residence-time abuse. Long hot idle periods, repeated stop-start running, and weak shutdown discipline all give residue more time to age inside the machine.
Just as important, they track contamination history. Which materials create the hardest cleanouts? Which transitions consume the most purge? Which lines show black specks again after restart? Once these patterns are tracked, cleaning stops being guesswork and starts becoming process management.
The most practical rule is this: judge cleanliness by process behavior, not appearance alone. A line is not truly clean because one short section of discharge looks acceptable. It is clean when it returns to stable, contamination-free production without recurring specks, repeated startup scrap, or another cleaning cycle immediately behind the first one.
Conclusion: Clean by Decision, Not by Habit
Cleaning an extruder screw and barrel is not just about maintenance labor. It is about making the right decision at the right time.
In most routine situations, purge is the correct first response. It is faster, less invasive, and usually sufficient when contamination is still behaving like ordinary carryover. But purge should not be expected to solve deposits that are already persistent, trapped, or repeatedly returning after apparent cleanup.
That is when tear-down becomes justified.
The best cleaning strategy is not the most aggressive one. It is the one that restores stable production with the least avoidable downtime, the least avoidable waste, and the least avoidable damage to the machine.
In extrusion, the goal is not to make the screw look clean. The goal is to bring the line back to clean, predictable output.
When contamination keeps returning, the right next step is not always more cleaning. Sometimes the bigger issue is whether the problem is truly residue, a process condition, or a fault elsewhere in the line. A broader extrusion troubleshooting guide can help separate those possibilities before the team loses more time on the wrong fix.
FAQ About Clean An Extruder Screw And Barrel
Q1: How do you clean an extruder screw and barrel?
In most routine situations, an extruder screw and barrel are cleaned by controlled purging to remove residual polymer and contamination. Mechanical cleaning is used only when deposits become persistent, trapped, or repeatedly return after purging.
Q2: When is purging enough for extruder cleaning?
Purging is usually enough when contamination is steadily decreasing, the output is becoming predictably cleaner, and the line returns to stable production without recurring black specks or repeated startup scrap.
Q3: When should you pull an extruder screw for cleaning?
You should consider pulling an extruder screw when contamination returns after apparently successful purging, when carbonized or aged deposits are suspected, or when residue is likely trapped in hold-up areas that purge cannot clean reliably.
Q4: What causes black specks after a material changeover?
Black specks after a material changeover are often caused by aged or degraded residual polymer that was not fully removed during the transition. Temperature changes, poor shutdown practice, and long residence time can make the problem worse.
Q5: Can purging remove all contamination from an extruder barrel?
Purging can remove a large amount of residual polymer and early-stage contamination, but it may not fully remove persistent, layered, or trapped deposits. In those cases, mechanical cleaning may be necessary.
Q6: Why does contamination come back after the extruder looks clean?
If contamination comes back after the extruder looks clean, the machine may still be carrying trapped deposits in low-flow or hold-up areas. In that case, the first purge may have removed only the easy residue, not the real source.
Have Technical Questions?
Our engineering team is ready to help with your extrusion process or machine configuration.
Jason Shen
Jason is the founder of Jinxin Extruder and a veteran engineer with over 20 years of hands-on experience in plastic machinery.
Starting his career on the shop floor, he mastered every technical detail—from electrical wiring to complex troubleshooting.
Today, he personally oversees final inspections, ensuring every machine is built with deep technical expertise and field-tested reliability.
Further Reading
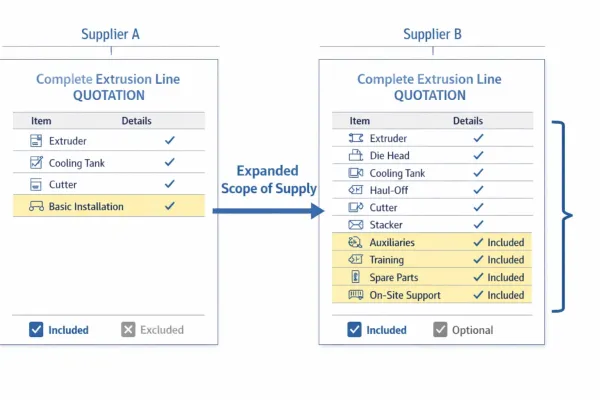
Extrusion Line Quotation: What Is Included and What to Check Before You Buy
Comparing extrusion line quotations? Use this scope of supply checklist to see what is included, what is typically excluded, and…Extrusion Screen Changer & Melt Filtration: How to Reduce Contamination and Pressure Fluctuation
A practical guide to screen changers in plastic extrusion — how melt filtration controls contamination, why screen changes cause pressure…