Why Is My Extruder Not Feeding? Common Causes and Fixes
Lede
When an extruder is not feeding, the natural reaction is often to increase screw speed, raise barrel temperature, or try to force material through. In most cases, that makes the problem worse.
If the screw is turning but little or no material is moving forward, the real problem is usually not lack of force. It is that normal solid conveying has broken down somewhere between the hopper and the feed section.
That is why extruder not feeding problems should be diagnosed in order, not by guesswork. Start outside the machine, then move inward — hopper first, feed throat second, material third, mechanical causes last.
In this article, you will learn:
- What feeding failure actually looks like and why it is different from low output or surging
- How to confirm it is really a feeding problem before touching any settings
- The three external hopper checks that rule out the simplest causes in under a minute
- Why feed throat overheating is the single most common cause of feeding failure — and how to confirm it
- How material properties — moisture, shape, additives — can make a properly functioning screw unable to pull
- When to suspect mechanical wear versus a process or material problem
- What you should never do when an extruder is not feeding
- A repeatable diagnostic sequence and preventive habits that reduce feeding failures
1. What “Extruder Not Feeding” Actually Looks Like
Before troubleshooting, it helps to define the problem clearly.
In practice, operators may describe the same issue in different ways:
- the screw is turning but no melt comes out
- output is weak or intermittent
- the machine starts, then loses feed
- the screw seems to rotate without pulling material
- the extruder is “running empty”
These symptoms all point to one basic condition: material is not entering or moving through the feed section properly.
A true feeding problem often shows up together with low or unstable output, falling melt pressure, reduced motor load, surging discharge, or a hopper that looks full from above while the throat below is actually starved.
This distinction matters. If the problem is truly a feeding failure, adjusting die temperature or haul-off speed will not help. The root cause is upstream — at the hopper, the feed throat, or the material itself — and that is where diagnosis should start.
Getting this distinction right saves time. If output is present but low, or if melt pressure is high rather than low, the problem may be a restriction downstream rather than a feeding failure. Check output, melt pressure, and motor load first. Make sure the issue is really about material not entering the screw, not about something blocking the exit.
2. Start Outside: Rule Out the Simplest Causes First
Before assuming there is a serious internal machine issue, check the most obvious external causes. These are responsible for a large share of feeding failures and take less than a minute to verify.
2.1 Is There Enough Material in the Hopper?
It sounds basic, but it should always be the first check. Low material level, inconsistent refilling, or interrupted upstream conveying can all create temporary starvation. On long production runs — especially with opaque hoppers or automatic loaders — operators sometimes do not realize the material supply has run out.
Do not only look at the top of the hopper. Confirm that material is actually reaching the outlet area.
2.2 Is the Slide Gate or Shut-Off Valve Open?
If the hopper has a slide gate, shut-off plate, or valve, make sure it is fully open. During cleaning, material changes, or maintenance, this gate gets closed. A partially closed gate may still allow some material to pass, which can create confusing symptoms such as intermittent output rather than complete stoppage.
Do not rely on memory. Physically verify the gate position.
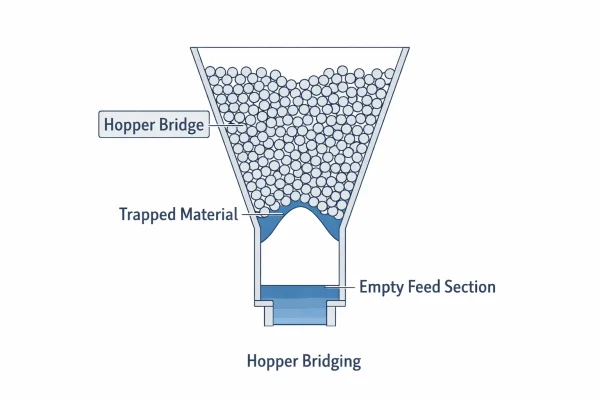
2.3 Is the Hopper Bridging?
Hopper bridging is one of the most common reasons an extruder stops feeding. Material forms an arch or “bridge” in the tapered section of the hopper, so resin remains in the hopper but does not drop into the screw.
This is especially common with irregular regrind, thin flakes, powder-heavy blends, dusty material, and low-bulk-density feedstock.
Typical signs include:
- hopper appears to contain material, but output drops sharply
- flow returns briefly after the hopper is disturbed
- feeding becomes unstable when regrind ratio increases
- starvation happens repeatedly even though the hopper is not empty
Quick fix: Break the bridge manually with a clean rod. Do not use metal tools that could damage the hopper or contaminate the material.
Long-term fix: Reduce fines content, improve material consistency, optimize hopper geometry (a steeper cone angle or larger throat opening), or install a hopper vibrator or agitator if the application requires it.
What we see in production: During commissioning, bridging problems almost never appear with fresh virgin pellets. They show up weeks later when the customer starts blending in regrind or switches to a different pellet geometry. If you plan to use regrind regularly, test the blend ratio in the hopper during initial setup — not after production targets are already committed.
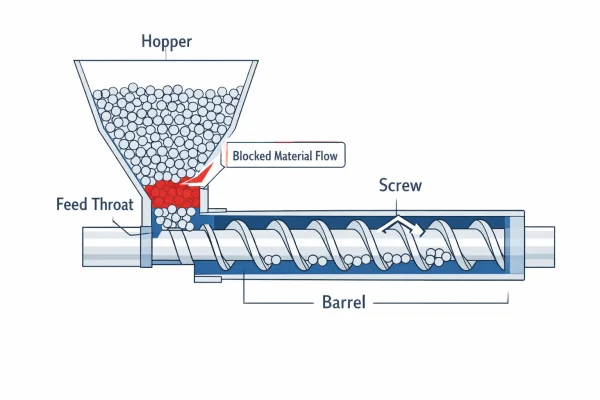
3. The Feed Throat: Where Most Feeding Failures Actually Happen
If the hopper is not empty, the gate is open, and material is not obviously bridged, the next place to check is the feed throat — the transition zone where pellets drop from the hopper into the screw channel. In many single-screw extrusion problems, this is the most important zone.
The feed section works properly only when pellets remain in a solid state long enough to be gripped and conveyed forward by the screw. Single screw extruders transport material through friction: the screw relies on a difference in friction between the pellet-to-barrel-wall interface and the pellet-to-screw-root interface. This frictional drag mechanism is the foundation of single-screw solid conveying — for a detailed technical treatment, see this open-access study on solid conveying behavior in single-screw extruders. If material softens too early, this friction mechanism collapses — pellets stop behaving like a free-flowing solid and start sticking instead.
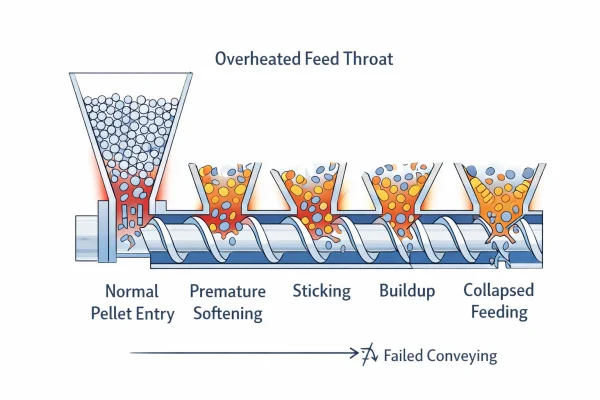
3.1 Is the Feed Throat Overheating?
This is one of the most common and most overlooked causes of no-feed conditions.
The feed throat is the only section of the extruder barrel that requires active cooling. It is designed to stay cool enough that pellets remain solid as they enter the screw. If cooling water is insufficient, blocked, too warm, or unstable, material can begin to soften or partially melt in the throat area.
Once that happens, feeding can fail quickly. The mechanism is simple:
- Material reaches an overheated throat or screw root area
- Pellets begin to soften too early
- Softened material sticks to the metal surface instead of being pushed forward
- A layer of semi-molten plastic builds up, effectively sealing the feed opening
- Fresh material can no longer fall in — the screw rotates, but effective conveying collapses
This often looks like: the extruder feeds normally at startup, then gradually starves; feeding becomes unstable during longer runs; restart after a short stop is difficult; and increasing temperature makes the problem worse instead of better.
If this is the cause, the first action is not to raise heat further. It is to check the feed-throat cooling system immediately.
Common cooling failures include:
- Cooling water supply valve partially closed or accidentally shut off
- Scale buildup or algae inside the cooling water channels (especially common in summer or in regions with hard water)
- Cooling water pump failure or reduced flow from a shared system
- Thermostat or solenoid valve malfunction
A common mistake is assuming that “water connected” means “cooling working.” Those are not the same thing. Check actual water flow rate, hose condition, inlet water temperature, and whether cooling is truly reaching the throat body.
What we check during FAT: Before every shipment, we verify feed throat cooling flow and temperature during the full-load production test. We record the baseline cooling water temperature and flow rate as part of the parameter set delivered with the line. If throat cooling fails months later, the customer can compare current conditions against these documented values to identify the deviation quickly.
3.2 Is the Feed Throat Physically Blocked?
Less common than overheating, but worth checking: a physical obstruction in the feed opening.
The throat can be obstructed by degraded material from a previous run, carbonized lumps, foreign contamination, compacted fines, leftover purge material, or metal fragments.
If there is a physical blockage, do not keep forcing the machine. Shut down safely, cool according to procedure, and inspect the area properly. Repeated attempts to push through a blockage often make cleanup harder and increase the risk of damage.
Installing a magnetic trap above the feed throat is a good preventive measure against metal contamination.
When cleaning old buildup or purge residue, see [How to Properly Clean an Extruder Screw and Barrel].
4. When the Problem Is the Material, Not the Machine
If the hopper and throat are both clear and cooling is normal, the problem may not be mechanical at all. It may be the material.
4.1 Is the Material Too Wet?
Wet material does not always cause a complete no-feed event, but it can absolutely contribute to unstable feeding, surging, sticking, and poor conveying behavior — especially with moisture-sensitive resins.
Moisture on pellet surfaces reduces the effective friction between pellets and metal. In extrusion, moisture can cause more than surface defects. It can also change how the material behaves at the feed section, particularly if the resin is supposed to be dried but is entering the machine in an inconsistent condition.
This is more likely when:
- the resin is hygroscopic (PC, PMMA, nylon, TPU)
- drying conditions are unstable or drying time is too short
- material is exposed to ambient air after drying
- regrind is mixed in without moisture control
If the material requires drying, do not treat that as a minor quality issue. It is part of stable process control. For a practical overview of drying parameters — including temperature, airflow, dew point, and time — see Plastics Technology’s resin drying fundamentals.
When the problem is material, not machine: A customer running PE pipe reported intermittent feeding failures every morning during the monsoon season. The extruder was fine. The problem was that overnight, pellets in the open hopper absorbed enough moisture from humid air to reduce friction at the feed section. The fix was simple: cover the hopper and pre-dry material before the morning shift. No mechanical repair was needed.
For a deeper explanation, see [Why Resin Drying Matters].
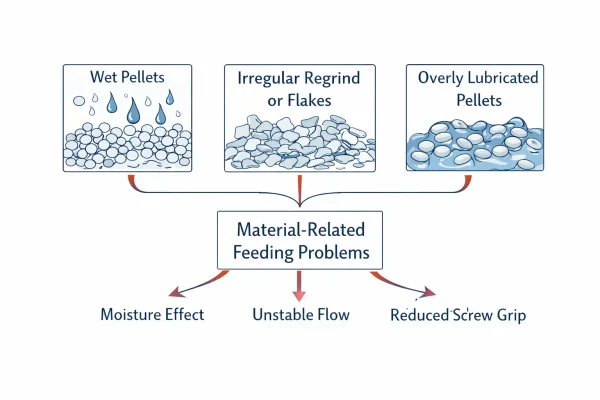
4.2 Is the Material Form Difficult to Convey?
Single-screw extruders feed best when the material form matches what the screw and hopper system are designed to handle. The screw’s feed section is geometrically designed for a specific range of pellet sizes and shapes.
Problems become more likely when switching from standard cylindrical pellets to:
- Fluffy regrind or large irregular chunks
- Very light film flakes with low bulk density
- Powder-rich blends that aerate instead of flowing
- Mixed-size recycled feedstock
These feedstocks may not fall consistently, compact evenly, or build a stable solid bed in the screw channel. The extruder may still run, but feeding becomes erratic and much more sensitive to small changes.
Fix: For occasional regrind use, blending with virgin pellets (typically 70/30 or 80/20) often restores stable feeding. For a permanent switch to powder or flake, the screw geometry may need to be changed — a deeper feed section or a grooved feed barrel liner can help. Consult your equipment supplier before making this change.
4.3 Is the Material Too Slippery?
Single-screw feeding depends on friction balance. If the material contains excessive external lubricant (waxes, stearates), has an unusual surface condition, or behaves too slippery in the feed zone, the screw may rotate without establishing strong forward conveying.
This is less common than bridging or throat overheating, but it does happen — especially after formulation changes.
A useful clue: Material appears to be reaching the screw, yet output remains weak and unstable without an obvious blockage. Pellets may appear oily or waxy on the surface.
Fix: Review the formulation. Reduce external lubricant dosage if possible. If the material is purchased pre-compounded, contact the supplier — the issue may be a batch variation.
5. When to Suspect Screw or Mechanical Problems
Mechanical causes should be considered — but not too early. They are often blamed before the simpler causes have been checked properly.
5.1 Is the Screw Worn?
A worn screw may lose its ability to grip, compact, and move material efficiently. Over thousands of hours, abrasive materials (glass-filled compounds, mineral-filled PVC, recycled material with contaminants) gradually wear down the screw flights. As the flight outer diameter decreases, the clearance between flight and barrel wall increases, and material that should be pushed forward instead leaks backward over the flights.
Screw wear usually causes a gradual decline, not a sudden no-feed event. That is an important distinction.
Signs that point toward wear include:
- throughput has been declining over time
- the machine has become harder to start consistently
- small material variations cause larger output changes than before
- motor amperage is lower than historical baseline at the same RPM
- the line used to process the same material more easily
What to do: Measure the screw flight OD and barrel bore ID. Compare against the original specifications (these should be documented in the equipment records). If clearance exceeds the manufacturer’s recommended limit, screw and/or barrel replacement is needed.
Mechanical wear is a slow process. If feeding failure appears suddenly on a line that was running fine yesterday, wear is almost certainly not the cause. Look at the simpler explanations first.
5.2 Is There a Screw-to-Material Mismatch?
Sometimes the screw is not damaged. It is simply not well matched to the feedstock being used.
A screw designed for regular pellets may struggle with very low bulk density material, powder-heavy formulations, or irregular recycled input. In that case, the issue is not operator error. It is that the screw geometry is no longer appropriate for the material behavior.
This should be suspected when:
- feeding problems started after changing material type
- the machine runs some materials well but not others
- hopper and throat checks are normal but conveying is still unstable
- the process only works after excessive manual intervention
At that point, it may be necessary to review screw design with the machine builder or process engineer.
6. What You Should Not Do
When an extruder is not feeding, several common reactions make the situation worse instead of better.
Do not blindly increase barrel temperature. If early softening at the throat is the problem, more heat increases sticking and reduces feeding further.
Do not keep increasing screw speed. A starved screw does not become healthy just because it rotates faster. In some cases, higher speed worsens instability.
Do not assume the die or downstream section is the main issue. If the screw is not receiving material correctly, downstream adjustments only distract from the real cause.
Do not jump straight to “the screw is bad.” That conclusion is often expensive and often premature. Rule out hopper, throat, and material problems first.
7. A Practical Troubleshooting Sequence
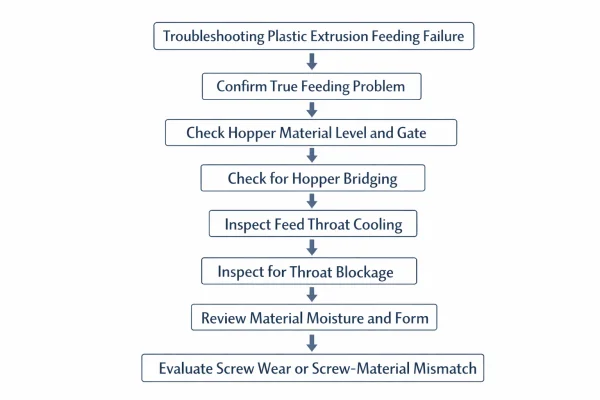
When an extruder is not feeding, use this order:
Step 1: Confirm it is really a feeding problem. Check output, melt pressure, and motor load. Make sure this is not mainly a downstream restriction.
Step 2: Check hopper basics. Confirm material level, gate position, and whether bridging is occurring.
Step 3: Check the feed throat. Focus on cooling, softening, sticking, and physical blockage.
Step 4: Check the material. Review moisture condition, regrind ratio, fines content, material form, and surface properties.
Step 5: Check the mechanical side. Only after the above steps should you move into screw wear, blockage history, or screw-to-material mismatch.
This order is practical because it starts with the most common and easiest-to-fix causes. At each step, if the answer is yes, fix it and test. If not, move to the next step. Do not skip ahead.
8. How to Prevent Feeding Problems Before They Stop Production
The best way to reduce feeding failures is to treat them as a system issue, not as random bad luck.
Useful preventive actions include:
- Monitor feed-throat cooling performance as part of the daily startup check — confirm water flow, not just connection For a structured approach to daily, weekly, and monthly checks — including feed throat cooling verification — see [Daily, Weekly, and Monthly Maintenance Checklist for Extrusion Machines].
- Keep hopper and throat areas clean; inspect after every material change
- Reduce excessive fines in regrind before blending
- Control resin drying strictly for hygroscopic materials — treat it as process control, not quality preference
- Record which materials tend to bridge or surge, and at what ratios
- Track gradual throughput decline that may indicate wear
- Avoid uncontrolled changes in regrind ratio or material form during production
A line that sometimes does not feed usually has a repeatable cause. The problem is often that no one has documented the conditions clearly enough to see the pattern.
What we recommend to all new customers: During commissioning, we record the full set of baseline parameters — including throat cooling water temperature, flow rate, and motor amperage at steady state. These numbers become the reference point. When feeding problems appear months later, comparing current conditions against the baseline usually identifies the deviation within minutes.
FAQ
Q1: Why is my extruder screw turning but not pulling material?
The most common causes are hopper bridging, feed throat overheating, throat blockage, wet or inconsistent material, or poor screw-to-material match. Start by checking the hopper and feed throat before assuming internal mechanical failure.
Q2: Can feed throat temperature stop an extruder from feeding?
Yes. If the feed throat gets too hot, pellets can soften too early and stick instead of moving freely into the screw. This is one of the most common and most overlooked causes of feeding failure.
Q3: Can wet plastic cause extrusion feeding problems?
Yes. Wet material can contribute to unstable conveying, surging, sticking, and inconsistent processing behavior, especially with moisture-sensitive resins such as PC, PMMA, nylon, and TPU.
Q4: Should I increase screw speed if the extruder is not feeding?
Usually no. If the material is not entering or conveying correctly, increasing screw speed often worsens instability instead of fixing the root cause.
Q5: When should I suspect screw wear?
Suspect screw wear when performance has been declining gradually over time, especially with abrasive or contaminated materials. Sudden feeding failure is more often caused by hopper, throat, or material issues.
Need Help Diagnosing Your Line?
If you have followed this sequence and the feeding problem persists, there may be a deeper process or hardware mismatch that requires hands-on evaluation. Describe the main symptom, when it appears, and which checks you have already completed. We can help you narrow down the cause and determine the right corrective path.
If the line is showing broader instability beyond feeding alone, see [Plastic Extrusion Troubleshooting: How to Diagnose Line Problems Fast].
Have Technical Questions?
Our engineering team is ready to help with your extrusion process or machine configuration.
Jason Shen
Jason is the founder of Jinxin Extruder and a veteran engineer with over 20 years of hands-on experience in plastic machinery.
Starting his career on the shop floor, he mastered every technical detail—from electrical wiring to complex troubleshooting.
Today, he personally oversees final inspections, ensuring every machine is built with deep technical expertise and field-tested reliability.
Further Reading
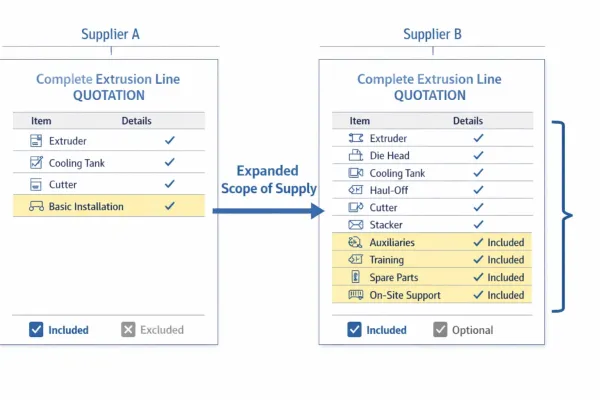
Extrusion Line Quotation: What Is Included and What to Check Before You Buy
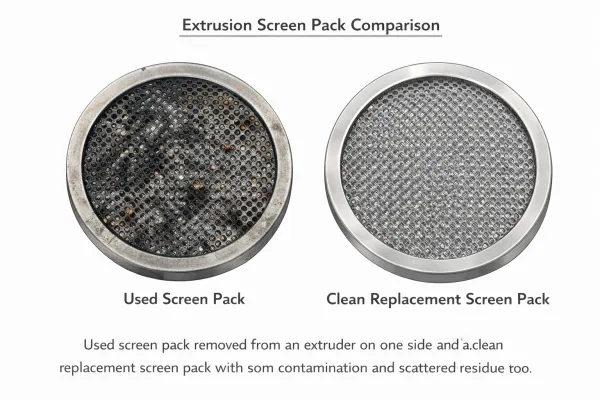
Comparing extrusion line quotations? Use this scope of supply checklist to see what is included, what is typically excluded, and…Extrusion Screen Changer & Melt Filtration: How to Reduce Contamination and Pressure Fluctuation
A practical guide to screen changers in plastic extrusion — how melt filtration controls contamination, why screen changes cause pressure…