Black Specks in Extrusion: How to Trace the Real Source
Lede
Black specks in extrusion products are one of the most common — and most misdiagnosed — quality problems on a plastic extrusion line.
When dark particles, burnt spots, or foreign contamination appear in the product, the first reaction on most production floors is predictable: raise temperature to push residual material out, run purge compound aggressively, or shut the line down for a full teardown. Sometimes all three happen within the same shift.
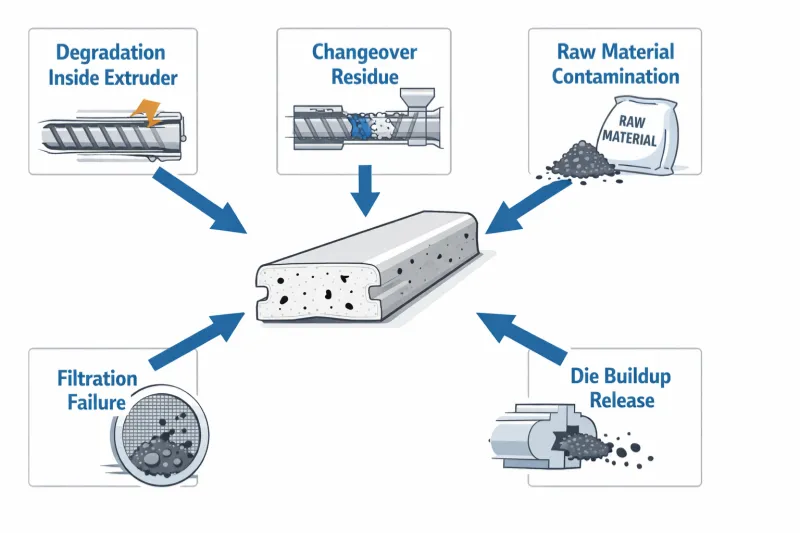
The problem is that black specks are not one problem. The same visual defect — dark particles embedded in the product — can originate from completely different sources:
- Degraded and carbonized material generated inside the extruder
- Residual material left behind after a color or material changeover
- Foreign contamination introduced through raw material, regrind, or the conveying system
- Filtration failure that allows particles to pass through unchecked
- Accumulated deposits inside the die or flow channel that release periodically
Each source follows a different mechanism. Each requires a different corrective action. And each leaves a different diagnostic pattern — if you know what to look for.
A full machine teardown addresses all of these at once, but it also costs the most time, the most production loss, and the most labor. In many cases, the contamination source could have been identified — and corrected — without stopping the line at all.
In this article, you will learn:
- Why black specks in extrusion should be classified by pattern before any corrective action
- How to use an isolation method to separate internal degradation from external contamination
- The four most common contamination sources and what each one looks like in practice
- What low-cost checks to perform before shutting the line down
- A quick-reference diagnostic table to match contamination patterns to likely sources
- How this article connects to the broader [plastic extrusion troubleshooting] framework
The fastest way to solve a black speck problem is usually not to clean everything first, but to narrow down where the contamination is most likely coming from.
1. Read the Pattern First: Random, Repeating, or Batch-Related?
Before opening any access doors or scheduling a shutdown, the first diagnostic step is to read how the black specks are appearing — not just whether they exist.
The occurrence pattern itself is diagnostic information. It separates causes faster than any single inspection point.
Ask these questions before touching any settings:
- Are the specks continuous, or do they appear and disappear?
- Are they completely random, or do they repeat at a recognizable interval?
- Did they start immediately at startup, or only after running for some time?
- Are they tied to a specific batch of material, or do they appear regardless of material source?
- Do they get worse at higher line speed, or stay the same?
The answers usually point toward one of three pattern types:
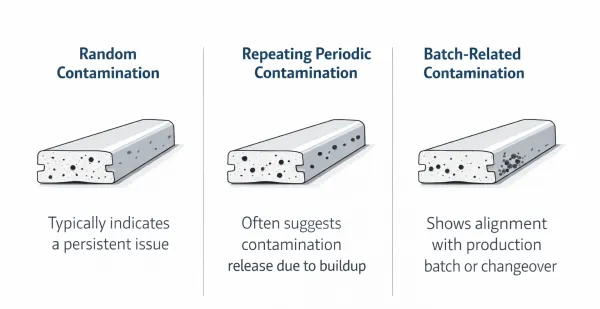
Random contamination
Specks appear without a clear cycle or timing. Some products are clean, others are not. This pattern is more consistent with external contamination — foreign particles from raw material, regrind, handling, or conveying — or with small amounts of residual material releasing unpredictably from hidden retention zones.
Repeating or periodic contamination
Specks appear at roughly regular intervals, or increase steadily with runtime. This pattern points more toward die build-up releasing in cycles, dead-spot accumulation inside the flow path, or progressive degradation from extended heat exposure.
Batch-related contamination
Specks appear only with a specific material lot, a specific regrind batch, or after a specific changeover. When material source changes, the contamination changes with it. This pattern is most consistent with raw material contamination or incomplete purging after a color or formula change.
What experienced operators notice first: If black specks always appear worse during the first 30 minutes after startup and then gradually reduce, the most likely direction is retained degraded material — not incoming raw material contamination. If specks suddenly start mid-run and correlate with a new bag or batch of regrind, material handling contamination moves to the top of the list. The pattern tells you where to look before you open anything.
These three categories do not cover every case perfectly. But they narrow the diagnostic direction significantly — and they cost nothing to observe.
Before deciding where to clean, first decide what kind of contamination pattern you are actually seeing.
2. Black Specks in Extrusion: How to Isolate the Source Before Tearing the Line Apart
This is the core method of the article. The goal is not to list every possible cause, but to give operators a structured sequence that reduces uncertainty step by step — before committing to expensive intervention.
The principle is simple: isolate before teardown. Low-cost observation first, high-cost disassembly last.
Step 1: Record the contamination pattern
Before doing anything else, document what you are seeing:
- When did black specks first appear? (time, shift, date)
- Are they continuous or intermittent?
- Are they tied to startup, steady run, changeover, or speed change?
- Do they appear in all output, or only certain runs or batches?
This takes five minutes. It prevents the most common diagnostic mistake: treating a pattern-specific problem as a general machine cleanliness issue.
Step 2: Separate internal generation from external introduction
This is the most important fork in the diagnostic path.
Signs pointing toward internal generation:
- Contamination increases with runtime or after long stops
- Specks look like dark, charred, or burnt particles
- Problem persists even after switching to clean virgin material
- Worse after startup or low-speed hold periods
Signs pointing toward external introduction:
- Contamination correlates with a specific batch, bag, or regrind lot
- Problem changes when material source changes
- Specks include non-plastic foreign particles (fibers, dust, metal flakes)
- Recently changed supplier, regrind ratio, or conveying setup
Getting this fork right avoids the most expensive misdiagnosis: tearing down the extruder and die when the contamination was never generated inside the machine.
Step 3: Check recent process events
Ask the production team:
- Was there a recent material or color change?
- Was the line stopped and restarted? For how long?
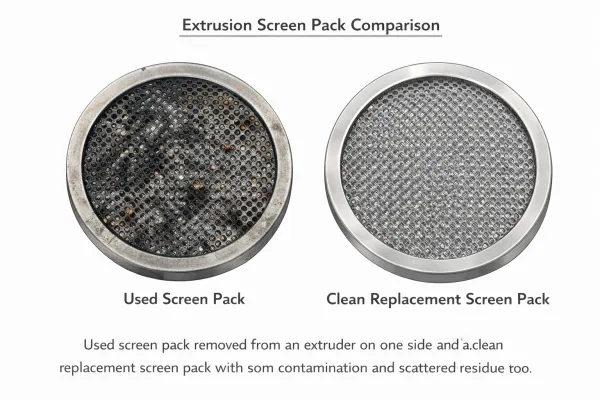
- Was the screen pack recently changed? Was it installed correctly?
- Was a new batch of regrind introduced?
- Were any upstream conveying or drying systems serviced or opened?
In most cases, black speck onset correlates with a specific process event. Identifying that event narrows the source dramatically.
Step 4: Inspect low-cost checkpoints before shutdown
These checks can be done while the line is still running or during a brief pause — no full teardown required:
- Raw material and regrind: Pull a sample from the hopper and visually inspect. Check for discoloration, foreign particles, dust, packaging fragments.
- Conveying path: Inspect the loader, transfer lines, and hopper interior for contamination buildup or residue from previous materials.
- Screen pack and filter: Review the last screen change timing. If a continuous screen changer is in use, check whether the screen has been advanced recently. Note whether contamination changed after the last screen swap.
- Die lip area: If safely accessible, visually inspect the die exit for buildup, drool, or discolored deposits at the lip edge.
- Time and batch log: Cross-reference contamination occurrence with material batch records and changeover history.
- Startup vs. steady-run comparison: Note whether contamination is worse during startup (points to retained degraded material) or constant (points to ongoing contamination source).
Step 5: Decide the scope of intervention
Only after Steps 1–4 should you decide the intervention level:
- If evidence points to raw material → switch material source or regrind lot, observe
- If evidence points to changeover residue → targeted purge cycle, not full teardown
- If evidence points to filtration → replace screen pack, check sealing
- If evidence points to die build-up → clean die and adapter, inspect flow path
- If evidence points to barrel/screw degradation → schedule [proper screw and barrel cleaning] with full disassembly
The best troubleshooting method for black specks is not to clean the whole line first, but to reduce uncertainty first.
3. When Black Specks Are Created Inside the Process
Some black specks are not brought in from outside. They are generated inside the extruder itself — through degradation, overheating, excessive residence time, or carbonized material accumulating in dead spots within the flow path.
How it happens
Plastic exposed to high temperature for too long begins to degrade. The polymer chains break down, the material darkens, and eventually it carbonizes — forming hard, dark particles that cling to metal surfaces inside the barrel, screw flights, adapter, or die channels.
These particles build up gradually. Then they release — sometimes in small amounts during steady production, sometimes in larger quantities after a process disruption like a stop-start cycle, a speed change, or a temperature adjustment.
Common triggers
- Barrel or die temperatures set higher than the material requires
- Extended residence time during low-speed operation or production pauses
- Dead spots in the screw design, adapter geometry, or die flow channels where material can stagnate — allowing small amounts of resin to degrade over time and release intermittently as black specks. This mechanism is well documented across plastics processing; for a related explanation of how trapped material in negative-flow areas creates intermittent contamination, see this analysis from Plastics Technology.
- Processing heat-sensitive materials (PVC, PETG, certain TPEs) without adequate temperature control
- Startup or restart after a long shutdown without proper purging
What this type of contamination looks like
- Dark, charred-looking particles — often harder than the surrounding material
- Contamination that worsens the longer the line runs without interruption
- More severe after startup, especially when the line was held at temperature during a stop
- Appears even with clean, virgin material — because the source is already inside the machine
- Sometimes concentrated in specific zones of the product cross-section, corresponding to flow-path dead spots
The judgment boundary
Not all black specks are degradation. Degradation is the primary suspect only when contamination pattern correlates clearly with heat history — runtime duration, stop-start events, temperature changes, or residence time.
If contamination does not change when you switch material batches but does change when you alter thermal conditions or run duration, degradation should be investigated before raw material or handling contamination.
If contamination increases with heat history, stoppage, or long residence time, degradation is often a stronger suspect than raw material contamination.
4. When the Problem Is Old Material Still Hiding in the Line
After a material change, color change, or formula adjustment, black specks or color contamination may appear — not because new dirt entered the line, but because old material was never fully removed.
Why changeover residue is easy to misdiagnose
Changeover residue does not always appear immediately. Old material can hide in low-flow zones for hours or even days before being gradually released. This creates a contamination pattern that looks intermittent and unpredictable — which is why it often gets blamed on “bad material” or “general machine cleanliness” instead of incomplete purging.
Where residue hides
- Rear section of the screw (low-pressure zones with poor sweeping)
- Barrel wall areas with reduced flow
- Adapter and breaker plate region
- Inside and around the screen changer
- Die internal corners, low-velocity zones, and transition areas
- Die lip edges where material can accumulate and periodically detach
What this type of contamination looks like
- Appears shortly after a color change, material switch, or regrind ratio adjustment
- Heavy at first, then gradually decreasing over time — but not disappearing completely
- Purging seems to help temporarily, then specks return
- Color contamination and black specks may appear together
- The same line and die combination tends to show this problem repeatedly after changeovers
The practical judgment
If contamination spikes after a changeover and then slowly decreases with continued production, this points more toward residual material release than toward new contamination entering the system.
The correct response is usually a more thorough or targeted purge — not an immediate full teardown. If purging alone does not resolve it, the retention zones need to be identified and physically cleaned. For the full cleaning decision framework — when to purge and when to disassemble — see [How to Properly Clean an Extruder Screw and Barrel].
When contamination is strongly tied to changeovers, the first suspect is often not new dirt entering the line, but old material being released from hidden retention zones.
5. When Contamination Comes From Outside the Extruder
Not all black specks originate inside the machine. In many cases, the contamination was already present before the material entered the barrel — introduced through raw material quality, regrind content, packaging, conveying systems, or the production environment itself.
This category is the one most often overlooked when troubleshooting starts from the assumption that “the machine must be dirty.”
Common external contamination sources
- Raw material defects: Discolored pellets, pre-degraded particles, or foreign inclusions already present in the bag or bulk delivery
- Packaging contamination: Paper fibers, woven bag fragments, dust, or label adhesive from damaged or improperly sealed bags
- Regrind contamination: Mixed-material regrind, degraded regrind from previous runs, metal flakes from granulator blade wear, or dust accumulation in regrind storage bins
- Conveying system contamination: Residual material in vacuum loaders, transfer hoses, or distribution boxes from previous production runs; dust or moisture accumulation inside conveying lines
- Hopper contamination: Material dust, condensation, or cross-contamination from manual addition of additives or masterbatch
- Workshop environment: Airborne dust, metal particles from nearby machining operations, or debris falling into open hoppers
What this type of contamination looks like
- Strongly correlated with a specific material batch, regrind lot, or supplier shipment
- More frequent when regrind percentage is higher
- Machine has been cleaned but contamination persists
- Contamination pattern changes when material source changes
- Visual inspection of raw material or regrind reveals visible foreign particles, discoloration, or dust
- Does not worsen with runtime — remains roughly constant as long as the same material is being used
The judgment boundary
If black specks track the material — appearing with one batch but not another, increasing with regrind ratio, or disappearing when you switch to clean virgin resin — then the machine is not the first place to look.
Eliminate external contamination as a possibility before committing to an internal teardown. Pull a material sample, inspect it visually, and check the conveying path. These are five-minute checks that can prevent a four-hour disassembly.
If contamination follows a batch, a regrind lot, or a handling event, the source may be outside the extruder rather than inside it.
6. When the Filter Misses It or the Die Releases It
Even when the contamination source is upstream, two downstream mechanisms often determine whether black specks actually reach the final product: filtration effectiveness and die deposit release. These are different failure modes and should be diagnosed separately.
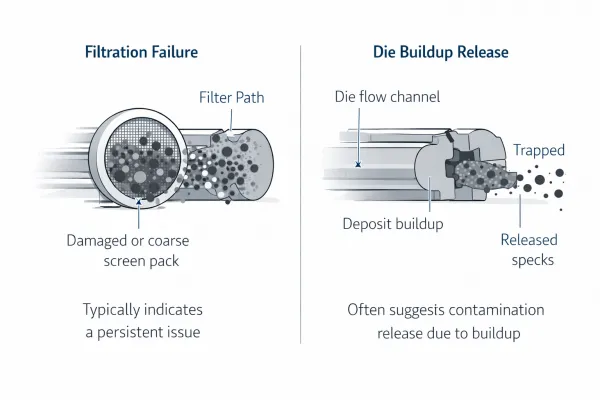
6.1 Filtration problems
The screen pack and filter system sit between the extruder and the die. Their job is to intercept contamination — degraded particles, foreign material, unmelted gels — before the melt reaches the die and becomes part of the product.
When filtration fails, contamination that would otherwise have been caught passes through into the product.
Common filtration failure modes:
- Screen pack mesh too coarse for the contamination particle size
- Screen pack damaged, torn, or improperly seated during installation
- Bypass or leakage around the screen pack due to worn seals or incorrect assembly
- Continuous screen changer not advanced frequently enough — the active screen area is partially blocked, reducing filtration effectiveness
- Screen change event itself introduces a brief pulse of unfiltered material
What filtration-related contamination looks like:
- Contamination level changes noticeably after a screen change — either improving (new screen catching more) or temporarily worsening (disturbed material passing through during the swap)
- Particle sizes and types are varied — not a single consistent type of speck
- Upstream contamination risk exists (regrind, degradation) but downstream product shows more contamination than expected for the screen mesh in use
- Tightening the screen mesh (finer filtration) reduces the problem noticeably
6.2 Die build-up and deposit release
The die head, flow channels, and die lip area are the final contact surfaces before the melt becomes a product. Over time, these surfaces can accumulate deposits — degraded material, carbonized residue, or additive build-up — especially in low-velocity zones, sharp transitions, and areas where the flow path geometry creates stagnation.
These deposits do not release continuously. They build up slowly, then detach in fragments — creating a contamination pattern that appears periodic or that worsens gradually with runtime.
What die build-up contamination looks like:
- Black specks appear with a recognizable periodicity or increase steadily over hours of production
- Cleaning the die and adapter produces immediate, significant improvement — but the problem returns after days or weeks
- Contamination is not random — it tends to recur in similar product positions or at similar intervals
- Certain die designs or product geometries are more prone to this problem than others
- Die lip shows visible accumulation, drool, or discolored material when inspected
The critical distinction
Filtration problems are about what gets through — the filter failed to stop contamination that already existed upstream.
Die build-up problems are about what gets released — the die itself becomes a contamination source through progressive accumulation and periodic shedding.
These are different mechanisms with different fixes. “The die is dirty” is not a useful diagnosis. Knowing whether the problem is filtration bypass or deposit release determines whether you need to change the screen, redesign the filtration setup, clean the die, or address a flow-path geometry issue.
A contamination problem may begin upstream, but whether it reaches the product often depends on the filter’s ability to stop it and the die’s tendency to release accumulated deposits.
7. One-Page Diagnostic Table: Contamination Pattern → Likely Source → First Check
This table is a first-response reference — not a guarantee of single-cause diagnosis. Use it to make the first move faster and more accurate.
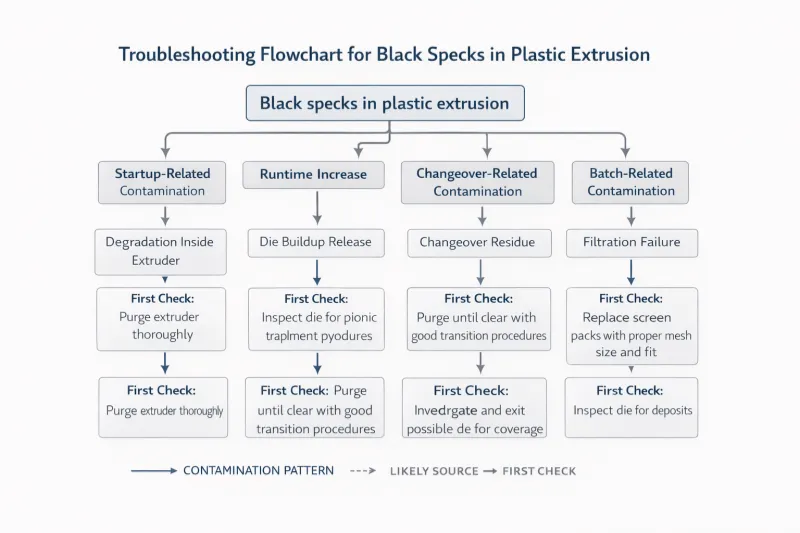
| Contamination Pattern | Most Likely Source | First Check |
|---|---|---|
| Worse after startup or restart | Degradation / retained carbonized material | Review heat history, residence time, stop duration |
| Increases steadily with runtime | Degradation or die build-up | Check die lip, inspect for dead-spot accumulation |
| Spikes after color or material change, then slowly decreases | Changeover residue | Evaluate purge effectiveness; check hidden retention zones |
| Tied to a specific material batch or regrind lot | Raw material / handling contamination | Inspect material source, regrind quality, conveying path |
| Changes noticeably after screen change | Filtration problem | Check screen pack condition, mesh size, and sealing |
| Periodic specks at roughly regular intervals | Die build-up releasing in cycles | Inspect die flow path, dead spots, and lip area |
| Persists regardless of material, batch, or changeover | Internal degradation or chronic flow-path issue | Check barrel/screw condition, adapter geometry, die dead zones |
| Appears only at high line speed | Insufficient filtration or residence-related degradation | Check whether filtration capacity and cooling are matched to throughput |
Operators can print this table and keep it near the line. The point is not to replace engineering judgment — it is to make the first diagnostic step faster.
8. Conclusion: Do Not Treat Every Black Speck the Same
Black specks in extrusion products look similar, but their causes can be fundamentally different. The difficulty is not that there are many possible sources — it is that different sources produce visually similar defects.
The four main contamination sources each follow a different mechanism:
- Internal degradation — carbonized material generated by heat, time, and flow-path stagnation inside the extruder
- Changeover residue — old material trapped in retention zones, released gradually after a material or color switch
- Raw material and handling contamination — foreign particles, degraded regrind, or environmental contamination introduced before the material enters the barrel
- Filtration failure or die build-up — contamination that passes through an inadequate filter, or deposits that accumulate inside the die and release periodically
The isolation method described in this article follows one principle: narrow the source before committing to maximum intervention.
- Read the contamination pattern — random, repeating, or batch-related
- Separate internal generation from external introduction
- Check recent process events for correlation
- Inspect low-cost checkpoints before scheduling shutdown
- Then choose the intervention that matches the most likely source
Not every black speck problem requires a full line teardown. Many can be resolved — or at least correctly diagnosed — with observation, sampling, and targeted checks that take minutes instead of hours.
For the overall framework of how to classify and approach any extrusion line problem — including contamination — see [Plastic Extrusion Troubleshooting: A Practical Guide to Diagnosing Line Problems Fast].
When black specks appear, the goal is not to clean the most parts first, but to identify the most likely source first.
FAQ About Black Specks In Extrusion
Q1: What is the fastest way to find the source of black specks in extrusion?
Read the contamination pattern first. Determine whether the specks are random, repeating, or batch-related. Then separate whether the source is more likely internal (degradation, retention) or external (material, handling). This two-step classification — before any physical inspection — usually eliminates at least half of the possible causes and tells you where to check first.
Q2: How can I tell whether black specks are from degradation or from raw material contamination?
Check whether the contamination changes when you change the material. If specks persist across different batches of clean virgin resin, the source is more likely internal — degradation, carbonized retention, or die build-up. If specks appear only with a specific batch or regrind lot, external material contamination is the stronger suspect.
Q3: Should I shut down the line immediately when black specks appear?
Not necessarily. Many contamination sources can be narrowed down — or even confirmed — without stopping the line. Record the pattern, check recent process events, inspect raw material and regrind visually, review screen change history, and compare startup vs. steady-run contamination levels. These low-cost checks often identify the direction before any disassembly is needed.
Q4: Why do black specks keep coming back after I clean the extruder?
If contamination returns after cleaning, the source may not be the barrel and screw. Common reasons include: die flow-path dead spots that re-accumulate deposits, incomplete purging that leaves material in hidden retention zones, ongoing raw material or regrind contamination that re-introduces particles after every cleaning, or a filtration system that is not catching upstream contamination effectively. The recurrence pattern — how quickly and under what conditions specks return — is the key to identifying which of these is responsible.
Q5: Is it possible that black specks come from more than one source at the same time?
Yes. A line can have mild degradation in a dead spot AND be running regrind with marginal quality AND have a screen pack that is slightly too coarse. When multiple sources overlap, the contamination pattern is harder to read because it does not fit cleanly into one category. In these cases, eliminate the easiest-to-check sources first (material, screen pack), then work inward toward degradation and die build-up.
Need Help Tracing Contamination on Your Line?
If black specks or contamination keep appearing and the source is not clear, send us:
- Material type and grade
- Virgin-to-regrind ratio
- When contamination first appeared and whether it is continuous or intermittent
- Whether the problem is startup-related, changeover-related, or steady-run
- Photos of the contaminated product and, if possible, close-ups of the specks
- Whether screen changes affect the contamination level
- Whether the problem appears across all output or only specific batches
The more context you provide about the contamination pattern, the faster we can help narrow down whether the source is degradation, residual material, raw material contamination, filtration failure, or die build-up — and recommend the right corrective path.
Have Technical Questions?
Our engineering team is ready to help with your extrusion process or machine configuration.

Jason Shen
Jason is the founder of Jinxin Extruder and a veteran engineer with over 20 years of hands-on experience in plastic machinery.
Starting his career on the shop floor, he mastered every technical detail—from electrical wiring to complex troubleshooting.
Today, he personally oversees final inspections, ensuring every machine is built with deep technical expertise and field-tested reliability.
Further Reading
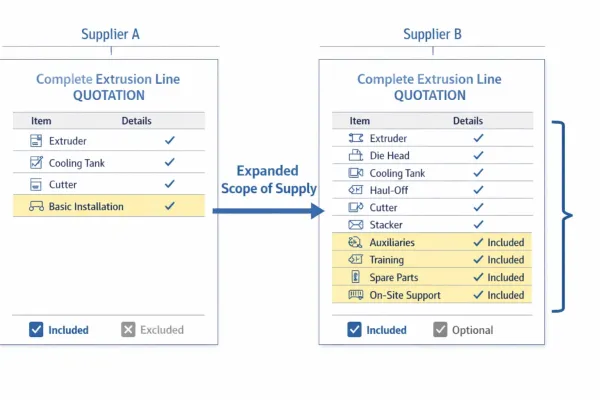
Extrusion Line Quotation: What Is Included and What to Check Before You Buy
Comparing extrusion line quotations? Use this scope of supply checklist to see what is included, what is typically excluded, and…Extrusion Screen Changer & Melt Filtration: How to Reduce Contamination and Pressure Fluctuation
A practical guide to screen changers in plastic extrusion — how melt filtration controls contamination, why screen changes cause pressure…