Plastic Extrusion Troubleshooting: A Practical Guide to Diagnosing Line Problems Fast
Lede
Plastic Extrusion troubleshooting becomes slow and expensive when operators react to symptoms without first identifying the problem type. A dimension issue, a feeding problem, contamination, or a station-specific failure may all look urgent, but they do not follow the same logic. The fastest way to troubleshoot an extrusion line is to classify the problem first, then follow the correct diagnostic path instead of adjusting settings blindly.
In this article, you will learn:
- Why most extrusion troubleshooting fails because of diagnosis order, not lack of effort
- How to classify any extrusion line problem into one of four repeatable categories before touching any settings
- When to use a symptom-first approach vs a station-first approach
- The most common mistakes that make a line harder to diagnose instead of easier
- How to recognize when multiple symptoms point to a system-level problem instead of an isolated cause
- How this troubleshooting series is organized so you can go deeper on your specific problem type
1. Why Plastic Extrusion Troubleshooting Often Becomes Confusing
Most extrusion troubleshooting failures come from poor diagnosis order, not lack of effort.
In real production, operators rarely face a single clean problem. A line may show unstable output, slight wall thickness drift, and occasional surface defects at the same time. Under pressure to keep production running, it is natural to start adjusting parameters immediately — screw speed, haul-off speed, temperature, or cooling conditions.
The problem is that early adjustment often hides the real cause instead of fixing it. One change may temporarily improve the symptom, while another part of the process continues drifting. After several adjustments, the line becomes harder to stabilize, not easier.
Another source of confusion is mixing symptom and cause. “The line is unstable” is not a diagnosis. It is only a description. Without separating what is happening from why it is happening, troubleshooting turns into guesswork.
A structured approach reduces this confusion. Instead of asking “what should I change,” the better question is “what type of problem is this?”
2. Start by Classifying the Problem, Not Guessing the Cause
The first step in troubleshooting is to identify the problem class, not to guess the machine setting.
Most extrusion problems fall into a small number of repeatable categories. Once the category is clear, the next step becomes much more straightforward.
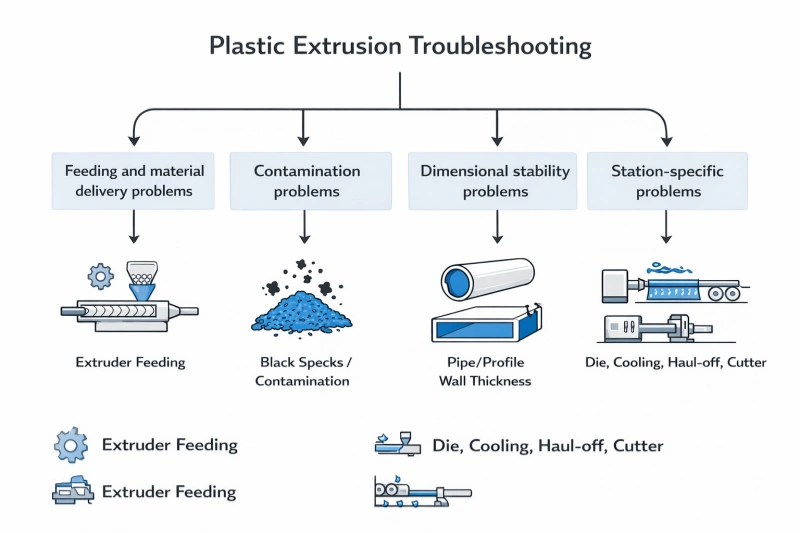
2.1 Feeding and Material Delivery Problems
Typical signs include:
- extruder not feeding properly
- output fluctuating
- material bridging in the hopper
- throat cooling issues
These problems originate from how material enters and moves through the extruder.
→ See [Why Is My Extruder Not Feeding?]
2.2 Contamination and Material Cleanliness Problems
Typical signs include:
- black specks
- burnt particles
- unknown contamination sources
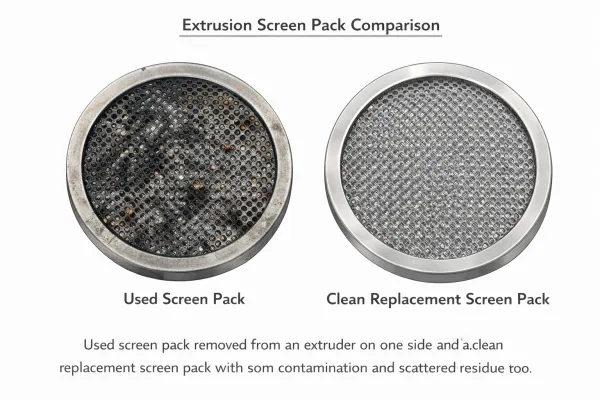
These issues are often misdiagnosed as “material problems” without isolating where contamination is introduced. When contamination appears, a fast first check is the screen changer — a loaded screen pack is one of the most commonly overlooked sources.
→ See [Black Specks & Contamination in Extrusion]
2.3 Dimensional Stability Problems
Typical signs include:
- wall thickness variation
- outer diameter drift
- meter weight instability
- size changes after speed adjustments
These problems usually reflect imbalance between output, haul-off, and downstream stabilization. For rigid products like pipe, dimensional deviation has direct consequences under standards such as ISO 4427
→ See [Dimension Drift & Wall Thickness Variation in Extrusion]
2.4 Station-Specific Mechanical or Process Problems
Typical signs include:
- issues localized at die, calibration, cooling, haul-off, or cutter
- problems that clearly originate from one section of the line
In these cases, troubleshooting should follow the physical layout of the line.
→ See [Troubleshooting by Station]
3. Symptom-First vs Station-First Troubleshooting
Good troubleshooting depends on knowing whether to follow the symptom or inspect the station first.
In practice, there are two valid ways to approach a problem, and choosing the wrong one wastes time.
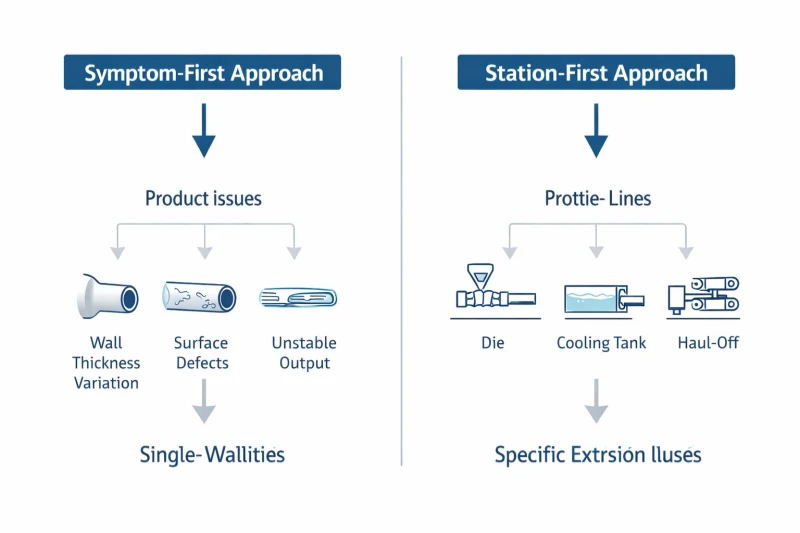
Symptom-First Approach
Use this when the problem is visible in the product:
- wall thickness is wrong
- surface defects appear
- output is unstable
- contamination is visible
In this case, the product tells you something is wrong, but not where. You follow the symptom and narrow down the cause.
Station-First Approach
Use this when the problem location is already clear:
- die-related issue
- cooling tank instability
- haul-off inconsistency
- cutter malfunction
Here, the problem is tied to a specific part of the line. You start from that station and work outward.
Choosing between these two approaches is often the difference between a fast fix and a long troubleshooting cycle.
4. What Not to Do During Troubleshooting
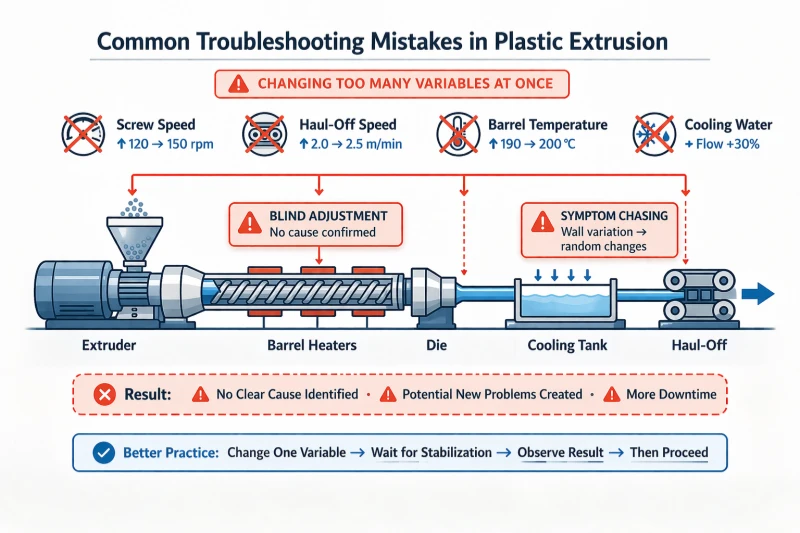
The fastest way to lose time is to adjust multiple variables before identifying the problem type.
Common mistakes include:
- changing screw speed, haul-off speed, and temperature at the same time
- assuming every dimension issue is caused by one setting
- treating contamination as a simple material issue without isolating the source
- repeatedly correcting symptoms without checking whether the system is stable
These actions often make the line harder to diagnose because they introduce new variables faster than the process can respond.
A stable troubleshooting process requires discipline. Identify first, adjust second.
5. When a Problem Is Bigger Than One Symptom
If several symptoms appear together, the line should be treated as a broader stability problem.

Examples include:
- unstable feeding combined with dimension drift
- contamination appearing together with temperature instability
- wall thickness issues together with haul-off inconsistency
- startup instability combined with cooling variation
In these cases, the problem is rarely isolated. The line is losing stability across multiple points at once.
When this happens, it is more effective to step back and follow a structured troubleshooting path instead of focusing on one symptom. Return to the classification framework in Section 2 above, then narrow down through the correct category.
This is especially important when the line shows more than one failure mode at the same time. A line that has unstable feed, unstable dimension, and visible surface defects is not giving you three separate problems. It is usually showing one system that has lost stability in several places at once.
That distinction saves time. It prevents operators from spending an hour fine-tuning wall thickness when the real issue is upstream inconsistency or downstream instability that has not been corrected.
6. Conclusion
The goal of extrusion troubleshooting is not to react faster, but to diagnose in the right order.
When a problem appears, the first step is to classify it correctly. Once the problem type is clear, the likely causes narrow down quickly, and corrective action becomes more effective.
Blind adjustment slows the process. Structured diagnosis speeds it up.
A stable line is not achieved by constant correction, but by understanding which part of the process is no longer matched and restoring that balance.
This troubleshooting series is structured to help you move quickly from symptom to action:
- [Troubleshooting by Station] → follow the physical line layout
- [Why Is My Extruder Not Feeding?]→ feeding and output problems
- [Black Specks & Contamination in Extrusion]→ contamination diagnosis
- [Dimension Drift & Wall Thickness Variation in Extrusion] → size and stability problems
Each page focuses on one type of problem so that you can go deeper without mixing different causes together.
FAQ
Q1:What is the fastest way to troubleshoot an extrusion line?
A:Classify the problem first. Most troubleshooting time is wasted on blind parameter adjustment. Before changing any setting, identify whether the issue is related to feeding, contamination, dimensional stability, or a specific station. Once the category is clear, the diagnostic path becomes much shorter.
Q2: How do I know if my extrusion problem is feeding-related or dimension-related?
A: Check where the symptom shows up. If the extruder is not pulling material consistently — output fluctuates, the hopper bridges, or the throat overheats — the problem is feeding-related. If the line is running and producing material, but wall thickness, OD, or meter weight are drifting out of tolerance, the problem is dimensional. In some cases both appear together, which usually signals a broader system instability.
Q3: Should I troubleshoot by symptom or by station?
A: It depends on what you already know. If the problem is visible in the product — wrong wall thickness, surface defects, contamination — but you do not know where it originates, follow the symptom and narrow down the cause. If the problem is clearly tied to one part of the line — die, cooling, haul-off, or cutter — start from that station and work outward.
Q4: What should I avoid when troubleshooting extrusion line problems?
A: Avoid changing multiple parameters at the same time. Each adjustment introduces a delayed response, and stacking changes makes it nearly impossible to identify which one actually helped. Also avoid treating every problem as a single-setting issue. Most extrusion problems are the result of mismatch between multiple parts of the process, not one wrong number.
Need Help Diagnosing Your Line?
Describe the main symptom you are seeing, when it appears, and which part of the line you suspect first. We can help you identify the problem category quickly and guide you toward the right corrective path.
Have Technical Questions?
Our engineering team is ready to help with your extrusion process or machine configuration.
Jason Shen
Jason is the founder of Jinxin Extruder and a veteran engineer with over 20 years of hands-on experience in plastic machinery.
Starting his career on the shop floor, he mastered every technical detail—from electrical wiring to complex troubleshooting.
Today, he personally oversees final inspections, ensuring every machine is built with deep technical expertise and field-tested reliability.
Further Reading
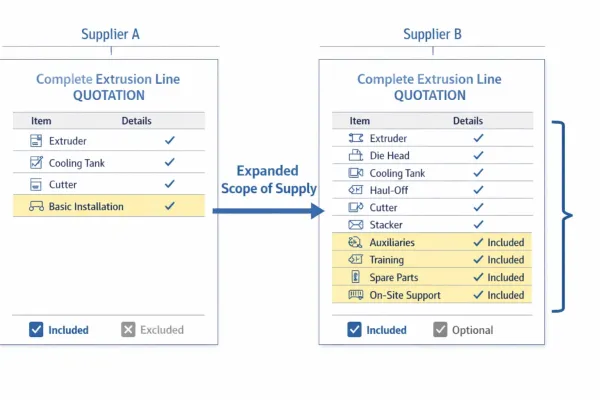
Extrusion Line Quotation: What Is Included and What to Check Before You Buy
Comparing extrusion line quotations? Use this scope of supply checklist to see what is included, what is typically excluded, and…Extrusion Screen Changer & Melt Filtration: How to Reduce Contamination and Pressure Fluctuation
A practical guide to screen changers in plastic extrusion — how melt filtration controls contamination, why screen changes cause pressure…